2023. 11. 27. 13:06ㆍSpring/스프링부트_핵심원리와 활용
지난 포스팅에서 하나하나 서블릿 컨테이너와 디스패쳐 서블릿을 연결하고 그거를 또 스프링컨테이너랑 연결하는 작업을 해보았다. 해보았을 때 느낀점은 진짜 많은 일을 해줘야하고, 이걸 다 기억 언제하지? 라는 생각이 들었다.
지난 과정을 보면
1) ServletContainerInitializer interface를 구현해서 서블릿 컨테이너 초기화 코드를 만들었음.
2) 어플리케이션 초기화를 위해서 @HandlesTypes annotation을 적용함
3) /META-INF/services/jakarta.servlet.ServletContainerInitializer 파일에 서블릿 컨테이너 초기화 클래스 경로를 지정함
이렇게 해줘야하는데 너무 번거롭고 힘들다. 그래서 개발자들이 힘든것을 알았는데 스프링MVC에는 이러한 서블릿 컨테이너 초기화 작업을 할수 있게끔 만들어져있다. 그래서 개발자는 애플리케이션 초기화 코드만 작성하면 된다.
spring 라이브러리를 보면 spring-web-6.0.9.jar 파일 안에 WebApplicationInitializer 파일을 찾을수 있다. 여기를 보면 아래와 같다.
WebApplicationInitializer
public interface WebApplicationInitializer {

    /**
     * Configure the given {@link ServletContext} with any servlets, filters, listeners
     * context-params and attributes necessary for initializing this web application. See
     * examples {@linkplain WebApplicationInitializer above}.
     * @param servletContext the {@code ServletContext} to initialize
     * @throws ServletException if any call against the given {@code ServletContext}
     * throws a {@code ServletException}
     */
    void onStartup(ServletContext servletContext) throws ServletException;

}
package hello.container;

import hello.spring.HelloConfig;
import jakarta.servlet.ServletContext;
import jakarta.servlet.ServletException;
import jakarta.servlet.ServletRegistration;
import org.springframework.web.WebApplicationInitializer;
import org.springframework.web.context.support.AnnotationConfigWebApplicationContext;
import org.springframework.web.servlet.DispatcherServlet;

public class AppInitV3Spring implements WebApplicationInitializer {
    @Override
    public void onStartup(ServletContext servletContext) throws ServletException {
        System.out.println("AppInitV3SpringMvc.onStartup");

        //스프링 컨테이너 생성
        AnnotationConfigWebApplicationContext appContext
                = new AnnotationConfigWebApplicationContext();
        appContext.register(HelloConfig.class);

        //스프링MVC Dispatcher Servlet 생성, 스프링 컨테이너 연결
        DispatcherServlet dispatcherServlet = new DispatcherServlet(appContext);

        //Dispatcher Servlet을 서블릿 컨테이너에 등록
        ServletRegistration.Dynamic servlet =
                servletContext.addServlet("dispatcherV3", dispatcherServlet);

        //모든 요청이 디스패처 서블릿 통하도록 설정
        servlet.addMapping("/");
    }
}
지난 포스팅에 AppInit이라는 인터페이스를 구현하였지만 여기서는 스프링이 제공하는 WebApplicationInitializer를 구현한다. 그리고 나머지 소스는 똑같다. 그림으로 보면 아래와 같다.

여기 보면 Dispatcher Servlet이 2개이다. 그림에서 보듯이 Dispatcher Servlet은 N개 만들수 있다. 스프링 구조에서 DIspatcher Servlet이 무조건 하나 밖에 없어서 하나만 만들수 있을줄 알았는데 그런건 아니였다. 하지만 딱히 Dispatcher Servlet을 여러개 만들 필요는 없어서 1개만 만든다.
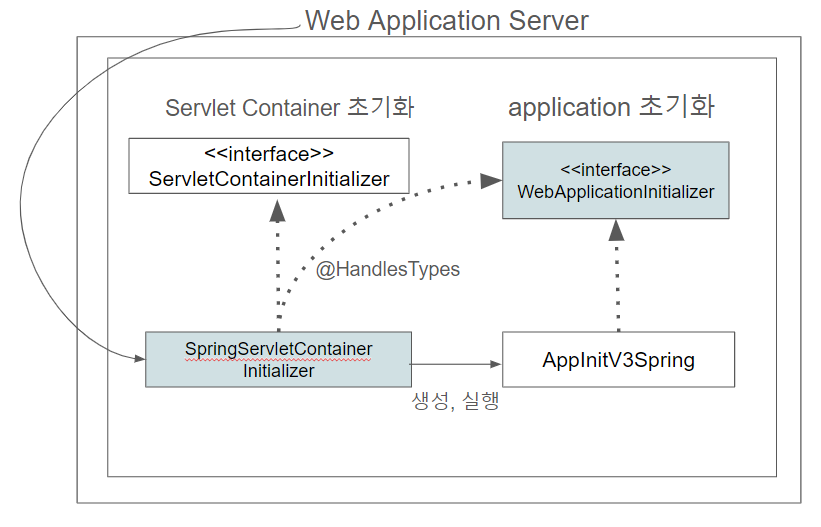
색깔이 있는 부분은 스프링에서 만들어서 제공하는 영역이다. 따라서 WebApplicationINitializer interface만 구현하면 편리하게 애플리케이션 초기화를 할 수 있다.
'Spring > 스프링부트_핵심원리와 활용' 카테고리의 다른 글
| 스프링 컨테이너 등록 (2) | 2023.11.26 |
|---|---|
| 서블릿 컨테이너 초기화2 (0) | 2023.11.26 |
| 서블릿 컨테이너 초기화1 (1) | 2023.11.16 |