2023. 11. 26. 00:59ㆍSpring/스프링부트_핵심원리와 활용
서블릿 컨테이너 초기화 하는 두번째 방법을 소개하겠다. 지난 포스팅에서 아래 그림 처럼 서블릿 컨테이너 초기화에 대해서 소개하였다.
서블릿은 서블릿 초기화를 위해서 Servlet interface(ServletContainterInitializer)를 제공한다. 그래서 onStartup method로 초기화를 하였다.
public interface ServletContainerInitializer {
    public void onStartup(Set<Class<?>> c, ServletContext ctx) throws ServletException;
}
위와 같이 실행 시점에 서블릿 컨테이너를 초기화한다. 여기까지 지난 포스팅에서 한 내용이다.
(지난 포스팅 보지 않았다면 클릭)
서블릿 컨테이너 초기화1
WAS를 실행하는 시점에 초기화를 해야하는 작업이 있다. 스프링 부트 강의를 듣다가 서블릿 컨테이너를 초기화 할 수 있다는 것을 처음 알게 되었다. 과거에는 web.xml으로 초기화하였지만 요즘에
nhs0912.tistory.com
이번 포스팅에서는 HelloServlet이라는 서블릿을 서블릿 컨테이너 초기화 시점에 프로그래밍 방식으로 직접 등록하는 방법을 알아보겠다.
먼저 Servlet을 만들자! 아래처럼 HelloServlet이라는 클래스를 만들고 HttpServlet을 상속받는다.
package hello.servlet;

import jakarta.servlet.ServletException;
import jakarta.servlet.http.HttpServlet;
import jakarta.servlet.http.HttpServletRequest;
import jakarta.servlet.http.HttpServletResponse;

import java.io.IOException;

public class HelloServlet extends HttpServlet {
    @Override
    protected void service(HttpServletRequest req, HttpServletResponse resp) throws ServletException, IOException {
        System.out.println("HelloSErvlet.service");
        resp.getWriter().println("hello servlet!!!");
    }
}
서블릿을 등록하는 2가지 방법이 있다. 강의에서는 어플리케이션 초기화라는 이름을 붙였다.
1) @WebServlet Annotation
2) 프로그래밍 방식
이렇게 두가지가 있다. 먼저 WebServlet Annotation 방법을 살펴 보자
package hello.servlet;

import jakarta.servlet.ServletException;
import jakarta.servlet.annotation.WebServlet;
import jakarta.servlet.http.HttpServlet;
import jakarta.servlet.http.HttpServletRequest;
import jakarta.servlet.http.HttpServletResponse;

import java.io.IOException;

@WebServlet(urlPatterns = "/webServlet")
public class WebServletAnnotationServlet extends HttpServlet {
    @Override
    protected void service(HttpServletRequest req, HttpServletResponse resp) throws ServletException, IOException {
        System.out.println("WebServletAnnotationServlet.service");
        resp.getWriter().println("webServlet annotation!!!");
    }
}
@WebServlet annotation을 사용하고 urlPatterns안에 매칭되는 url 주소를 쓴다.
그러면 웹에서 주소를 http://localhost:8081/webServlet 입력하면 service method가 실행된다.
(port :8081은 각자 tomcat port에 따라 다르다)
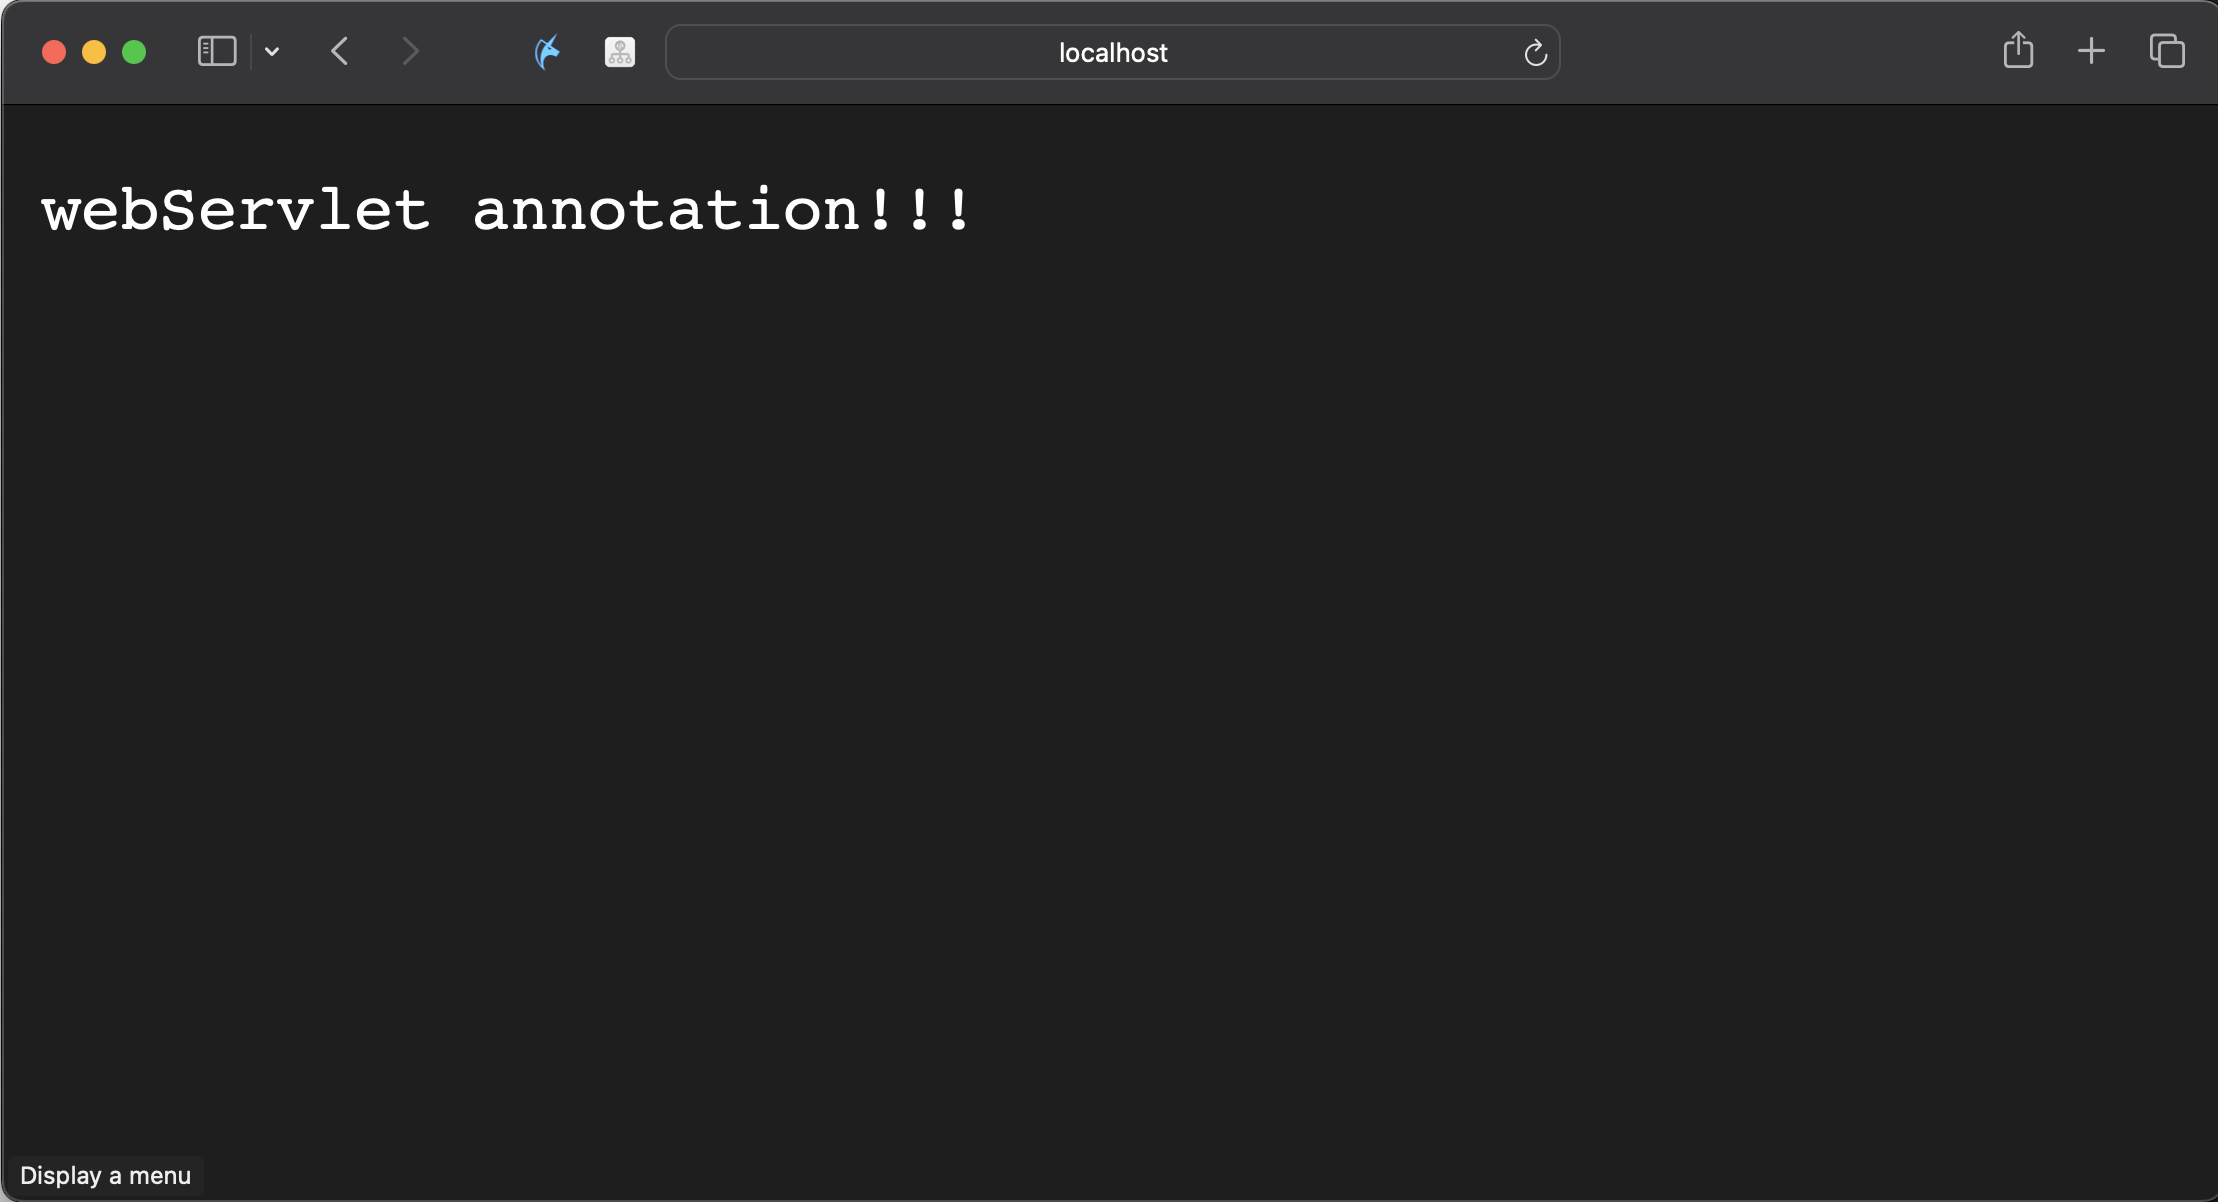

소스에 있는것 대로 "webServlet annotation"이 웹페이지에 표시가 되고 "WebServletAnnotationServlet.service"이 console에 나오게 되었다.
다음으로는 프로그래밍 방식을 사용해보자!
package hello.container;

import jakarta.servlet.ServletContext;

public interface AppInit {
    void onStartUp(ServletContext servletContext);
}
먼저 AppInit interface를 등록한다. 거기에 onStartUp method를 선언한다.
package hello.servlet;

import hello.container.AppInit;
import jakarta.servlet.ServletContext;
import jakarta.servlet.ServletRegistration;

public class AppInitV1Servlet implements AppInit {

    @Override
    public void onStartUp(ServletContext servletContext) {
        System.out.println("AppInitV1Servlet.onStartUp");

        //순수 서블릿 코드 등록
        ServletRegistration.Dynamic helloServlet =
                servletContext.addServlet("helloServlet", new HelloServlet());
        helloServlet.addMapping("/hello-servlet");
    }
}
AppInit를 구현하고 프로그래밍 방식으로 addServlet method로 helloServlet을 등록한다.
그러면 "/hello-servlet"을 웹에서 호출하면 HelloServlet이 실행된다. 하지만 지금 이렇게만 하면 호출이 되지 않는다. 왜냐하면 아직 어플리케이션 초기화를 하지 않았기 때문이다.

그래서 MyContainerInitV2를 추가해준다.
package hello.container;

import jakarta.servlet.ServletContainerInitializer;
import jakarta.servlet.ServletContext;
import jakarta.servlet.ServletException;
import jakarta.servlet.annotation.HandlesTypes;

import java.util.Set;

@HandlesTypes(AppInit.class)
public class MyContainerInitV2 implements ServletContainerInitializer {
    @Override
    public void onStartup(Set<Class<?>> c, ServletContext ctx) throws ServletException {
        System.out.println("MyContainerInitV2.onStartUp");
        System.out.println("MyContainerInitV2 c = " + c);
        System.out.println("MyContainerInitV2 ctx = " + ctx);

        //class hello.container.AppInitV1Servlet
        for (Class<?> appInitClass : c) {
            try {
                //new AppInitV1Servlet() 같은 코드
                AppInit appInit = (AppInit) appInitClass.getDeclaredConstructor().newInstance();
                appInit.onStartUp(ctx);
            } catch (Exception e) {
                throw new RuntimeException(e);
            }
        }
    }
}
@HandlesTypes에다가 AppInit interface를 추가한다.

그리고 여기다가 서블릿 초기화할 클래스를 등록한다.

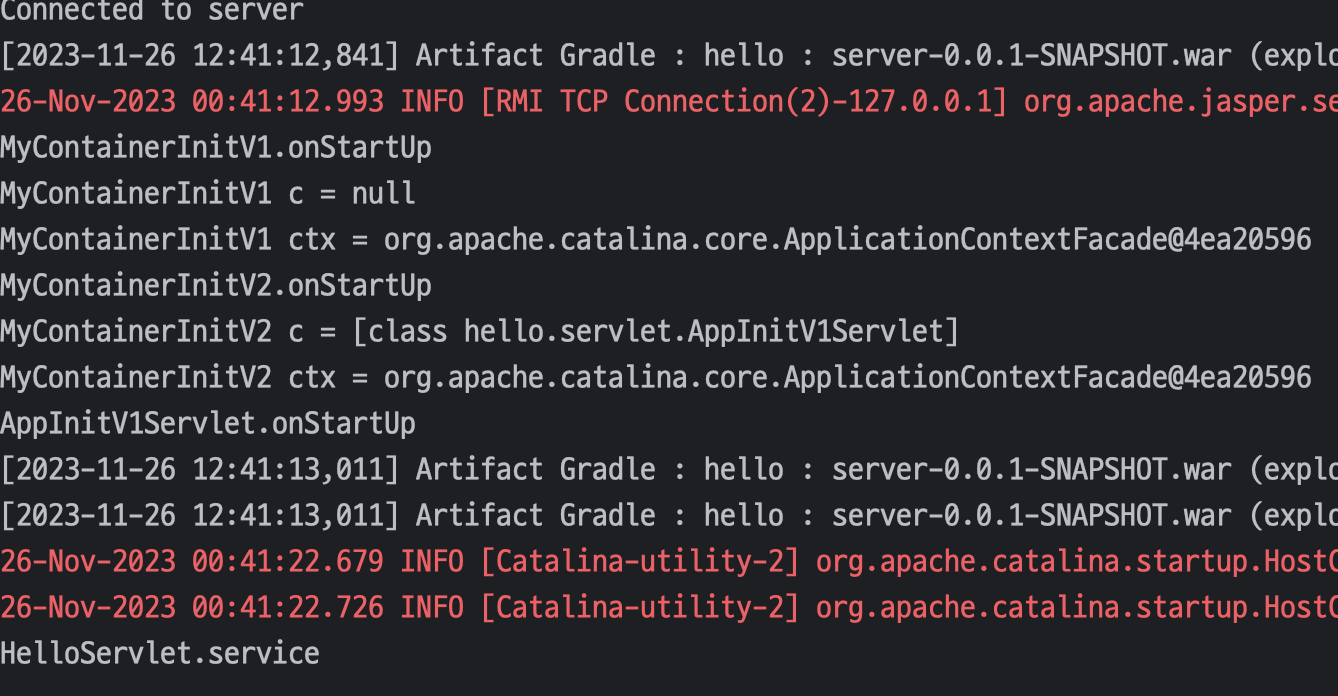
http://localhost:8081/hello-servlet로 접속을 하면 아래와 같이 실행된다.

console 화면에서는 아래와 같이 작동되었다. 서블릿 컨테이너 초기화를 파라미터로 넘어오는 Set<Class<?>> c에 애플리케이션 초기화 인터페이스의 구현체들을 모두 찾아서 클래스 정보로 전달한다. 그래서 애플리케이션 초기화 한 AppInitV1Servlet이라고 나왔다. 그리고 리플렉션을 이용해서 객체를 생성한다.

글을 작성하다가 문득 드는 궁금점은 아래와 같이 new AppInitV1Servlet()과 같은 소스인데 왜 리플렉션을 이용했을까이다.
//new AppInitV1Servlet() 같은 코드
AppInit appInit = (AppInit) appInitClass.getDeclaredConstructor().newInstance();
@HandlesTypes(AppInit.class)
public class MyContainerInitV2 implements ServletContainerInitializer {
@Override
public void onStartup(Set<Class<?>> c, ServletContext ctx) throws ServletException {
System.out.println("MyContainerInitV2.onStartUp");
System.out.println("MyContainerInitV2 c = " + c);
System.out.println("MyContainerInitV2 ctx = " + ctx);
//class hello.container.AppInitV1Servlet
for (Class<?> appInitClass : c) {
try {
//new AppInitV1Servlet() 같은 코드
AppInit appInit = new AppInitV1Servlet();
appInit.onStartUp(ctx);
} catch (Exception e) {
throw new RuntimeException(e);
}
}
}
}그래서 위처럼 new AppInitV1Servlet()으로 변경하고 실행해보았다. 그랬더니 아주 잘 실행이 되는 결과가 나왔다. 내 생각엔 저렇게 new로 하면 특정 AppInitV1Servlet만 초기화가 될것이다. 여기에 목적은 Annotation을 사용한 모든 메서드를 찾아서 초기화하는 것이 목표이기 때문에 리플렉션을 통해서 어노테이션 사용한 클래스(서블릿)을 찾아서 새로운 객체를 얻는것이 좋겠다고 생각하였다.

그런데 왜 프로그래밍 방식이 필요할까?
1) 그 이유는 Annotation 방식은 유연하게 바꾸기 어렵기 떄문이다. 예를들어서 /hello-servlet 경로를 상화에 따라 외부설정을 읽어서 등록이 가능해야한다.
2) 서블릿 자체도 특정 조건에 따라서 if문으로 분기해서 등록해야한다.
3) 서블릿을 직접 생성하기 때문에 생성자에 필요한 정보를 넘길 수 있다.
현재를 그림으로 나타내면 아래 그림과 같다.

그러면 지금까지 애플리케이션 초기화에 대해서 알아보았다. 다음에는 스프링 컨테이너 등록에 대해서 포스팅할 예정이다.
참고자료 : 김영한의 스프리우트
'Spring > 스프링부트_핵심원리와 활용' 카테고리의 다른 글
| 스프링 MVC 서블릿 컨테이너 초기화 지원 (0) | 2023.11.27 |
|---|---|
| 스프링 컨테이너 등록 (2) | 2023.11.26 |
| 서블릿 컨테이너 초기화1 (1) | 2023.11.16 |